Shoot with Rachel

A little late in posting this as I’ve been putting together a new gallery.  Now that it’s up and working I have a few backlogged shoots to post about.  Back in May I found myself in southwest Virginia and specifically in the lovely little town of Blacksburg for a few days.  While there I had a chance to shoot with the lovely Rachel.

Working with models while traveling gives the chance to work with new models and the interesting challenges that come from limited equipment.  In this case I only had what I could fit in a camera bag and part of a suitcase.  The first problem that comes up usually is location and in this case we actually did the shoot in my hotel room when a hoped for spot fell through at the last minute.

Working in a hotel room is especially challenging given the small space of many hotel rooms.  In this case I had Rachel, myself, and the friend she brought to the shoot leaving us a tight space.  The key as in any shoot is to make your location work for you and not against you.

A few of my favorite photos and some thoughts about them.

IMG_0099

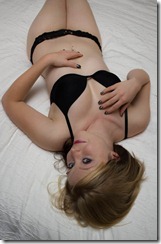
Rachel is a model with experience doing nude work.  She’d brought a friend with her to the shoot so I wasn’t worried about making her feel safe as much as making her feel comfortable working with me.  I usually do this by starting with some non-nude work.  It gives me a chance to build some interaction with the model in a more relaxed environment than when the clothes come off.  I also thought that lingerie images would go well with the bedding of this hotel room.  I think the expression on her face sells this one as it adds a sense of playfulness sexiness to it.  The lighting for the photo was done by pointing a Canon 580 Speedlight on the camera hot shoe straight up where it bounced off the ceiling and then down onto her.

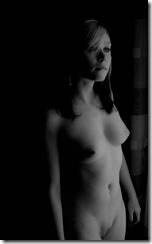
IMG_0166 Here Rachel is posed next to a window.  It was late evening when we did the shoot and we had bright indirect sunlight coming in the window to the room.  For most of the shoot I left the curtains closed, but for a series of shots I placed her at the window lit only by the sunlight coming in.  The room was on the second floor and looked out over the mostly empty parking lot of an apartment complex.  While comfortable working nude, Rachel did have some concerns about being seen from outside standing next to the window so we left the translucent curtain in place.  In this photo I like the way the shadows clearly highlighting her curves and general form along with the sad look on her face.  I intentionally broke one rule by cropping away space she’s looking into in favor of show the emptiness behind her which I think gives it more of a lonely feel.

IMG_0185

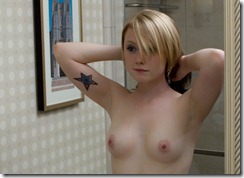
I also enjoy these more candid type images (hence the title of this blog).  It looks like it could be a picture of Rachel getting ready for her day or even a background photo taken while getting ready for the shoot.  Someone asked me if I thought of taking out the tattoo, but I like the aspect of her personality that it gives to the image.  The photo is of Rachel’s reflection in the bathroom mirror.  The biggest problem in taking this photo was finding an angle I liked while keeping myself out of the reflection in the tight quarters of a hotel bathroom.

Exposure – Building Your Image

Exposure is the amount of light you allow to reach the film or image sensor when you take a photo.  This amount of light is largely determined by the aperture and shutter speed you set along with the ISO of your image sensor or film which we covered in the last article.

A scene has an exposure that determines the amount of light needed to correctly light the scene.  The exposure needed for a scene is generally measured in exposure values or EV.  An EV of zero represents the exposure obtained from an aperture of f/1 along with shutter speed of 1 second and an ISO of 100.  Every change you make that halves the amount of light such as doubling the shutter speed or halving the aperture will increase the exposure by 1 EV.  So a scene with an EV of 5 represents half the light that an EV of 4 does.  This means that an aperture of f/5.6 (which is 5 stops or ½ x ½ x ½ x ½ x ½ the light) with the shutter speed left at 1 second and ISO left at 100 would result in an EV of 5.  If we leave the aperture at f/5.6 and reduce our shutter speed to 1/125 of a second while leaving the ISO at 100, we would now have an EV of 12 as 1 second to 1/125 of a second is 7 stops (or ½ x ½ x ½ x ½ x ½ x ½ x ½) less light.

Most digital cameras can meter a scene and provide a pretty accurate exposure in most cases.  This is usually a mode on the camera called something like automatic or automatic exposure.  There might be several of these modes that give varying degrees of freedom to control settings other than shutter speed and aperture.  The camera does this by analyzing the amount of light that is reflected off of the scene and back to the camera.

You can also use a light meter to determine the exposure for a scene.  Most light meters can measure the light reflected back much as the meter inside your digital camera does.  You can also use a light meter to measure the amount of light that is falling on the scene directly.  This is called incident light.  We will talk about light meters and using them in the next entry in this series.

There are also a few handy rules of thumb that can give you the exposure needed for a scene.  The rule of 16 is a common one that states on a sunny day the correct exposure would be achieved with an ISO of 100, an aperture of f/16 along with a shutter speed of 1/100 second.

However you arrive at the exposure needed for the scene, once you have it the next task is to determine what combination of shutter speed, aperture, and ISO that you wish to use to produce this light.  You will generally be mostly concerned with aperture and shutter speed with the ISO set to allow correct exposure.  As we mentioned in the last article, shutter speed primarily allows you to freeze or show motion while aperture allows you to control depth of field or how much of your photo is in focus.  After setting either aperture or shutter speed depending on what you wish to do in the photo, you must then set the other along with the ISO to produce the correct exposure to capture an image.

Once you have set the three to produce the perfect exposure you will sometimes find that things are a little off.  The shutter speed may be a little too long allowing blurring of the subject or the aperture may be too large blurring parts of the image you wish to keep in focus.  The benefit of knowing exposure is that you can adjust these values and keep them in balance.  The concept of the stop, a change that doubles or halved the amount of light falling on the sensor, allows us to make an adjustment and keep the exposure in balance.

For example if your image is taken with a shutter speed of 1/60 second, and ISO of 100, and an aperture of f/5.6.  You find that the subject of you photo is moving too much and blurry.  So you decide to reduce the shutter speed to 1/125.  This halves the amount of light reaching the sensor so you’ve decreased the exposure one stop.  To compensate you must either increase the aperture one stop to f/4 or decrease the ISO one stop to 50.

This also allows you to make compensations if your image is underexposed (too little light reaching the sensor) or overexposed (too much light reaching the sensor).  If your image is overexposed then you can decrease the aperture or shorten the shutter speed will reduce the amount of light falling on the sensor.  A small adjustment will bring a slightly off image into balance.

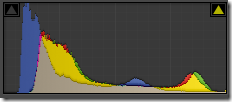
The digital camera is the perfect tool for learning exposure because your results show immediately through the LCD on the back along with the ability to display the histogram for each image.  Looking at the image on the back will visually allow you to tell if the image doesn’t look right.  The histogram is a graph that represents how light is distributed in your photo.  The left end represents the shadows or dark areas of the photo while the right end represents the highlights or bright areas.  In the middle are the mid-tones of your photo.

A properly exposed image should look like a nice gentle curve starting at zero on the left, be higher in the middle, and then drop down to zero again on the right like this:

image

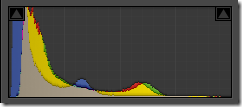
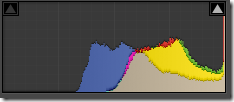
An underexposed image the histogram will show will be shifted to the left starting above zero on the left usually meaning there is image data “lost” in the shadows.  In an overexposed image, the histogram will be shifted to the right ending with the histogram at above zero meaning that there is data likely lost in the highlights.  Don’t worry as much about the heights of the bars or the overall shape, but if there is a sign that data is being lost off either the right or left side.

image             image

With digital cameras it is easier to correct underexposure than overexposure.  If you shoot in RAW mode (more about this to come) then you can pull data out of a slightly underexposed image, but things in an overexposed area are usually lost.

The Three Key Concepts –Shutter Speed, Aperture, and ISO


When it comes to photography, the most important element that you must master is light. I’ve heard photography referred to as painting with light. That is because the basic element of your image is exposure, the amount of light that falls on the film or image sensor when taking a photograph. It sounds like a simple concept, but as with most simple things there are complications. Today we are going to talk about the three basic elements that together make up exposure. The three elements are shutter speed, aperture, and ISO. Let’s take each of these individually first. Balancing these elements to achieve the results that you want in your photos will be a crucial skill in bringing your artistic vision to your photographs.

Shutter Speed

Shutter speed is simply how long the shutter is open and the film or image sensor is exposed to light. It should be obvious that the longer the shutter is open, the more light will reach the sensor and the brighter the image will be. The other effect of leaving the shutter open longer is that any motion by the subject will appear on the final image. This can sometimes be a desirable effect. For example when photographing a waterfall you will often want the movement of the water over the falls to show on the image and this can be achieved by lengthening the time the shutter is open. In general fast shutter speeds freeze motion while a slow shutter speed will blur motion.

Shutter speeds are expressed in a fraction of seconds. A digital SLR camera will normally show only the bottom part of the fraction. For example a shutter speed of 1/200 of a second, meaning the shutter is open for one two hundredth of a second, will usually show on the camera as 200. Times greater than or equal to one second will normally show the number or seconds along with an indicator, often an s, to show that it should be seen as seconds and not a fraction of a second. A change in the shutter speed that either doubles (for example changing from 1/200 to 1/100) or halves it (changing from 1/200 to 1/400) will double or halve the amount of light that reaches the sensor respectively. This change is often referred to as a stop.

The biggest problem that can occur with longer shutter speeds is camera shake, where the movement of the camera causes the image to blur. It takes surprisingly little movement to introduce a blur into the image. A good rule is that with a steady hand you can generally use an exposure of 1 over the focal length of the lens or shorter without worrying about camera shake. With image stabilization on the camera or lens or developing a way to steady your hand, you can often get away with a longer exposure than that rule would indicate. For very long exposures a tripod can provide a stable camera platform.

Most cameras have a mode call shutter priority mode that allows you to set a desired shutter speed and the camera will determine the aperture to provide a proper exposure.

Aperture

Where shutter speed determines how long light is allowed to reach the sensor or film, aperture is how large the opening light comes through is set. As you might guess the larger the aperture, the brighter the image with the shutter speed and ISO set the same as more light will be allowed in to the image.

The effect of aperture on an image is to control the depth of field, or how much of your image is in focus. You can think of depth of field as the distance in front of and behind the point of focus or focal point of your image that will be in focus. A larger aperture will have a smaller depth of field than a smaller aperture. So the larger your aperture, the more of the image will be in focus. Commonly in portrait photography, the aperture is set to be large so the subject is in focus and the background will be softly blurred. In a landscape image you would normally want a small aperture so the entire landscape is sharp and crisp.

Aperture is expressed in terms of f-stops such as f/2, f/4, etc. Again as with shutter speed most cameras only show the number so that f/2 will be shown by the camera as 2 and f/22 will be shown by the camera as 22. When determining if you have a large or small aperture, remember that these are fractions so an aperture of f/2 (shown on the camera as 2) will actually be larger than an aperture of f/4 (shown on the camera as 4). Moving from one aperture (such as f/4) to the next (such as f/5.6) is referred to as one stop. Note that a stop is not quite a simple doubling or halving of the number as it is with shutter speed (and ISO to come). A list of the full stops you’ll encounter most are:

f/2 f/2.8 f/4 f/5.6 f/8 f/11 f/16 f/22 f/32

Moving from one of these to the next is a full stop. Many camera lenses will have settings between these full stop values that are either ½ or 1/3 of a stop each. For example the lens I have on my camera right now gives me these aperture options:

f/4.5 f/5 f/5.6 f/6.3 f/7.1 f/8 f/9 f/10 f/11 f/13 f/14 f/16 f/18 f/20 f/22 f/25 f/29

Each lens will have a range of f-stops that it is capable of providing. The minimum and maximum apertures the lens is capable of will normally be printed on it or in the documentation with the lens. You will often hear the terms fast and slow to describe a lens. This is in reference to the maximum aperture of the lens. A lens with a maximum aperture of f/8 is slower than one with a maximum aperture of f/4.5.

Most cameras have a mode that allows you to set the aperture to a desired value and the camera will calculate the appropriate shutter speed to produce a correct exposure.

ISO

ISO is how sensitive that your film or sensor is to light. This is measured as ISO or ISO equivalent for digital cameras. The normal ISO for outside on a sunny day is 100. A doubling scale is used with ISO and most digital cameras will start at ISO 100 and go up from there. Increasing the ISO will produce a brighter image with the shutter speed and aperture left constant.

Most digital cameras produce the best quality image at their lowest ISO setting. As you increase the ISO you will begin to introduce unwanted noise into the image. This noise will usually appear in a digital image as a multicolor grain or dots in the image. Some sensors will see more noise than others, but as ISO increases an increase in noise is unavoidable. Most modern digital cameras can produce acceptable images even at higher ISO values. If quality of the image is most important, then you want to use the lowest ISO value that you can.

Now that we’ve discussed the three basic concepts, next time we will discuss more how they relate with the idea of exposure and how to use them together to get the images that you want.